pooleo
New Member
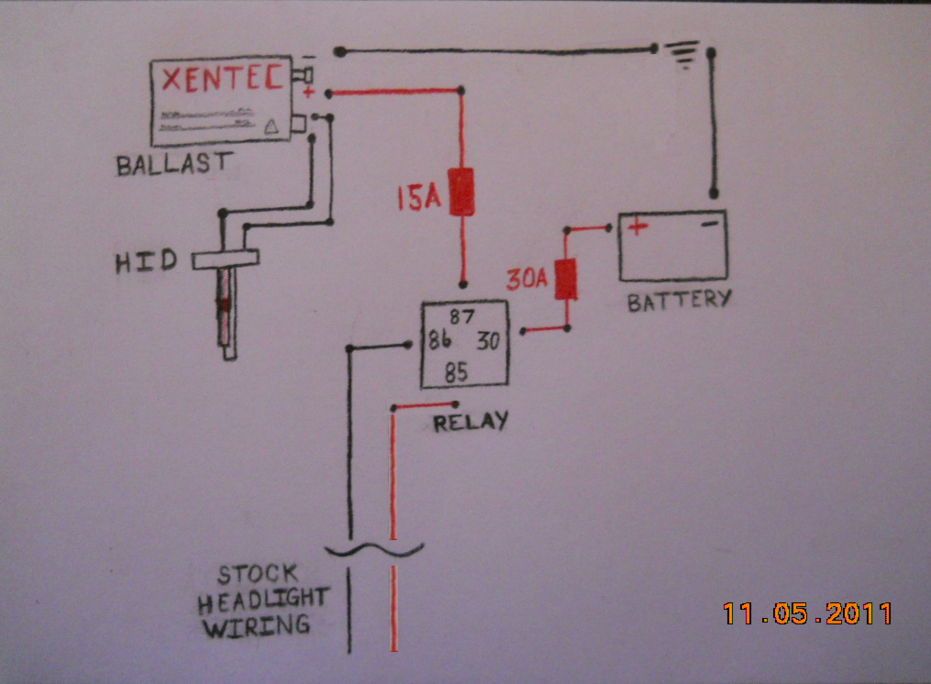
Here is a wiring Diagram for a do-it-yourself harness. And a list of materials needed.
THIS IS FOR A SINGLE BEAM INSTALL OF H.I.D
Materials:
~20ft of 14 gauge automotive wire.
(1) Automotive Relay
(3) Automotive Fuses. (2 15A) (1 30A)
(1) Package of water proof Female Spade connectors.
(1) Package of water proof Ring Terminals.
(1) Package of water proof Butt Splice connectors.
(1) Roll of electrical tape or liquid tape.
(1) Roll of corrugated wire loom.
(1) Package of 4" zip ties.
(1) Pair of latex gloves or alcohol wipes.
Optional: Rosin Core solder.
Tools:
Mulit Meter.
Crimp Pliers.
Wire Snips.
Wire Strippers.
Lighter/Small butane torch
Optional: Solder Iron.
****Note: Water proof connectors may also be labled as "heat shrink" or vice versa****
So now that we have the Materials and Tools. You can get started with the wiring. You can opt to solder your connections if you choose. Follow the diagram below for picture instructions. In this install, we will be cutting the male plug off the stock vehicle wiring. Be sure to leave enough wire on the factory plug that you 'could' put it back in place. The factory head light wiring will act as our trigger to the relay to power the HID's. You will want to use your mulit meter to determine polarity of the HL wiring. You will need to find the Ground and the LOW beam wire. This can be done by simply using your meter to find what wire is hot while HL are on (high beam off).
I will add pics of actual install soon.
For (2) ballasts, you will need to split off the #87 wire BEFORE THE FUSE! Each Ballast will require its own 15A Fuse.
I ADVISE AGAINST USING NON-WATER PROOF CONNECTORS!
Last edited: